|
Gummi Garage
Gummi Ship building has come a long ways since Kingdom Hearts. And it has become even more than just getting from one place to the other. Missions are found in each destination gate, and you will want to make a great ship to get through these missions with high scores.
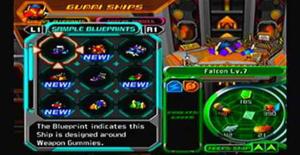
There are three menus to begin, our one we want is the Gummi Garage. In here, you will find the editing tools that will help get you started. There are 3 blueprint types, The blue are the recomended ships, pink are special models you get from missions, and lastly the yellow are the custom ones you make from scratch.
Getting through the Gummi Garage
As you might have noticed, there is a lot of stuff inside the garage. But it is easier to get around than you might think.
To begin there are two menus that are quite similar. One (Which you begin on) is for the Material Gummies. These are the bulk of the ship that provide its dimensions. The second which is selected by pressing  is for the Deco Gummies. These have special features, and are broken down into Weapons, Movement, and Auxiliary Gummi. Since Material and Deco Gummi are completely unique, they cannot be altered in each others menus. is for the Deco Gummies. These have special features, and are broken down into Weapons, Movement, and Auxiliary Gummi. Since Material and Deco Gummi are completely unique, they cannot be altered in each others menus. |
 |
 |
The Two Menus
The menu in the two different areas are very similar as well. So there is no extra stuff to learn. What is done in one menu is done the same in the other one. But let us look at the image here, and see what we have.
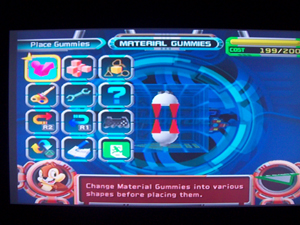
This is the Material Gummi Menu, as I was making my Teeny Ship. (More on that below) Here is where yo do everything in the garage from making the ship, to painting it up and giving it abilities. This is really the only difficult part, as placing the blocks is somewhat similar to Kingdom Hearts. You have a grid, in which you place the Gummi Blocks to make your ship. There are a couple of differences however. One is you do not require Cockpits, engines, or wings in order for your ship to fly. Just placing the blocks is enough. Though you will not have extra speed and such with your ship. In some cases it is not needed.
Also there is a limit bar, which dicates how many blocks you can have. This goes to 800. Once you have spent the cost to build a ship, you can no longer add Gummi Blocks. So you need to pay attention to what the cost is. This is shown in the top right of the building grid. Below we will get into what each menu choice does. |
 |
This is where you add Gummi's into the grid. Click this button, and it will bring you into the different classes of either Material or Deco Gummi. And from there you can choose what you wish to put in. Here is where it all begins. |
 |
Copy and Paste allows you to make duplicates of certain parts for a little less effort in building. Or you can mirror copy, which allows for keeping your ship cemetrical. Ether way, this is a handy little tool to have around. |
 |
Shaping the Gummi blocks has a great deal of worth to it. This effects your HP, and is a good way to make minor adjustments to a ships parameters.
Inside is three menus: Add Curves, Add Bevels, and Add points. will allow you to change a larger area. And lastly, when adding a point, use the left analog stick to pick the direction of the point. |
 |
Paint allows you to select coloring for the Gummi Blocks in your ship. Remember the paint will only work on the blocks for the menu you are in. For instance, if you are in the Material menu, you can only paint Material blocks. If you want to choose a wider color or skins (Once you get them), enter the paint mode, and press down. Then press to toggle between the paint and the skins. |
 |
This allows you to edit any pre-existing blueprints you have made, or have won. |
 |
This is the Tutorial or Help button. If there is any questions on how something works, or what buttons to press to do this or that, this is the place to read up on it. |
 |
With the Undo, you can fix whatever your last action was. So if you do somethign you did not want to do, simply hit this button, and it will set back was was done. |
 |
This is redo. This will, as it says, redo whatever the last thing was you undid in your building. Simple and sweet. |
 |
This is where you can change the control settings for your Gummi Garage to whatever you want it to be. Similar to the control settings for the game itself. So there is little need for further explanation. |
 |
This icon represents the Menu Change between the material and the deco Gummi. It is not needed to hit this button though. From this menu, all you need to do to switch is hit the button anytime you want to go to the other menu. This is just here, maybe for the unification of having the properly even amount of icons??? |
 |
Here is where you save your modifications and blueprints. Without saving, you will lose all of your work when you exit the garage. Be sure to save if you want to keep what you have done. |
 |
This is the exit out of the Garage Menu. If you are constructing a ship, and want to save it, be sure to do so before exiting. It will ask whether you want to leave without saving progress. So it is not bad to accidentally hit it first. |
Key to Successful Gummi Missions
This has been something proven to be 100% successful and kind of defeats the purpose of going through the entire garage. This is what I believe should be done.
I went through the entire game for the first couple of years, just using the most updated blueprint I obtained in my travels. The only mission I could not pass was Assault on the Dreadnought III. I just could not get through it with the most advanced ship I had. So I kind of just gave up on it.
A year or so ago, I came across this ship on Youtube, and decided I really needed to try this ship out, because it seemed impossible that it would in fact work. And here it is.
| Part |
Part |
Amount needed |
 |
Bevelled Gummi |
28 Needed |
 |
Neon Bar |
16 Needed |
 |
Blizzaga Gummi |
2 Needed |
 |
Graviga Gummi |
2 Needed |
Now you might be wondering how this is so successful. There is actually very little to the ship itself. Well, the success is in the design. Most if not all enemies when firing at you aim for the center of the ship. Even in this design, they will still aim for it. Without anything in the center of the ship, you are basically immune to most of their attacks. And it is in fact a very powerful ship weapon wise. In 99.99% of the missions using this ship, I scored a  +5 or greater. In the final Assault on the Dreadnought with this ship, I scored a +9! +5 or greater. In the final Assault on the Dreadnought with this ship, I scored a +9!
And with this you will need some Abilities as well.
2 Cannon Upgrades
2 Draw
Formation change
Active Formation
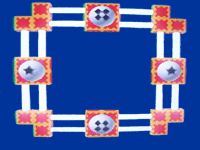
Now there is really nothing that cannot be acheived and or destroyed. But lets make it even better shall we? Lets add a Teeny Ship into the frey. This is another very simple and effective design
 This little guy requires only 10 parts total. This little guy requires only 10 parts total.
| Part |
Part |
Amount needed |
 |
Curved Gummi |
8 Needed |
 |
Firaga Gummi |
1 Needed |
|
Blizzaga Gummi |
1 Needed |
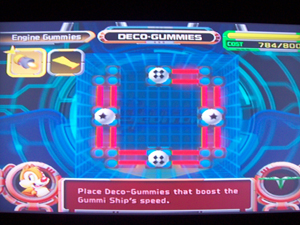
Set the Curved Gummi like they show here, place the Firaga Gummi on the bottom, and the Blizzaga on the top. When you go on your missions, you can select it twice, giving you two of these little destroyers. When in the mission, hit the  to make them constantly circle the main ship for a set period. This makes it almost impossible to get a drop on your ship from anywhere. This is absolutely the best ship combination and design I have come across anywhere in the internet. I wish I knew who the original designer was, as I would certainly provide the credit for it. But here it is, a perfect weapon for any of the missions out there. If you have any ships you wish to submit, let me know, and I will place them up here as well. to make them constantly circle the main ship for a set period. This makes it almost impossible to get a drop on your ship from anywhere. This is absolutely the best ship combination and design I have come across anywhere in the internet. I wish I knew who the original designer was, as I would certainly provide the credit for it. But here it is, a perfect weapon for any of the missions out there. If you have any ships you wish to submit, let me know, and I will place them up here as well.
|